Database Setup
Why Do We Need a Database?
Section titled “Why Do We Need a Database?”Right now our app can’t remember anything. When you refresh the page, everything is gone. A database lets our app store and remember information permanently, like your job applications.
What is SQLite?
Section titled “What is SQLite?”For our job application tracker, we’re using SQLite as our database. SQLite is a lightweight, file-based database that’s perfect for getting started with database development.
Unlike larger database systems like PostgreSQL or MySQL that run as separate servers, SQLite stores all your data in a single file on your computer. This makes it incredibly easy to set up - there’s no complicated server configuration or installation process. You just create a file, and you have a working database.
SQLite is production-ready and powers many applications you probably use every day. Plus, it works seamlessly with Cloudflare’s infrastructure.
Setting up our Database Tables or Models
Section titled “Setting up our Database Tables or Models”For this project, we’ll use Prisma as our ORM (Object Relational Mapper). An ORM is a tool that acts as a translator between your JavaScript code and your database - instead of writing raw SQL commands like SELECT * FROM users, you can write JavaScript like db.user.findMany(). This makes it much easier to work with databases because you can use familiar JavaScript syntax, and Prisma automatically generates the complex SQL for you. It also helps prevent common database errors and makes it simple to define your database structure and create migrations.
I like to start by going through the application design files and making a list of all the tables (models) and fields we need.
Each model represents the type of data that will be stored in the database.
We need models for:
- Users
- Job Applications
The “trick” with database design is to prevent duplication. For example, we want to store the company information for each job application. There’s a chance we’ll have multiple job applications for the same company. If we store the company information directly in the Application model, we might have duplicate entries. This could create all kinds of problems. If something changes, every instance of the company information would need to be updated. Plus, there are also formatting issues to consider: is it RedwoodSDK, redwoodsdk, redwood-sdk, or RedwoodSdk?
Instead, we can store the company information in a separate model, with a single entry for each company, and “link” it to the relevant job application.
The same applies to Contacts. We can create a separate model and create a relationship between the contact and the related company.
- Companies
- Contacts
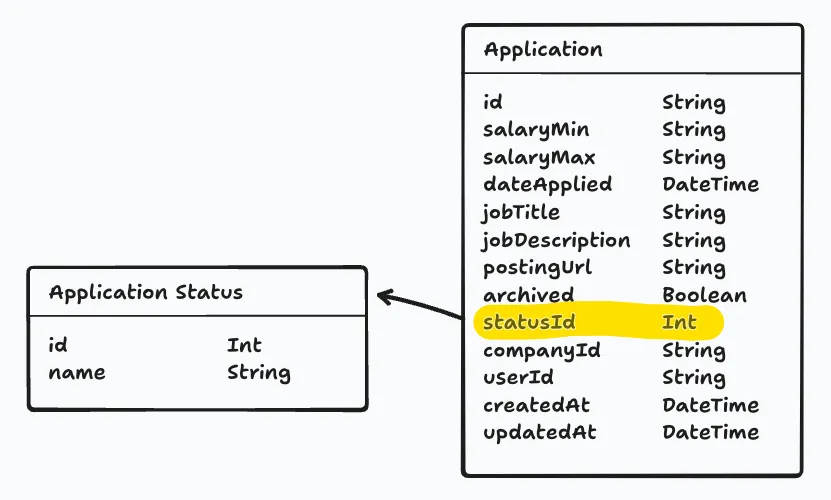
Application Statuses are a little different, but the same principle applies. To avoid duplication, we will give statuses their own model. We will have a set of fixed status options (New, Applied, Interviewing, Offer, and Rejected).
- Application Statuses
Columns
Section titled “Columns”Now, that we know what our models are, we need to create the columns. What are the pieces of data we need to store for each model?
We’ve already alluded to the data that we’ll need within the relationship diagrams, but let’s take a closer look.
Most tables I create include an id, createdAt, and updatedAt field.
id- We need a way to uniquely identify each record or row in the database.createdAt- We need to know when the record was created.updatedAt- We need to know when the record was last updated.
Data Types
Section titled “Data Types”As you’re making a list of all the data we need to store, you’ll also need to think about the data type of each column.
In Prisma, there are 9 different data types:
| Prisma Type | Description |
|---|---|
String | A UTF-8 encoded string |
Boolean | A true or false value |
Int | A 32-bit signed integer |
BigInt | A 64-bit signed integer (for large numbers) |
Float | A floating-point number |
Decimal | A high-precision decimal number |
DateTime | An ISO 8601 timestamp |
Json | Arbitrary JSON data |
Bytes | Binary data (Base64-encoded) |
When it comes to ids, there are 2 different types: String and Int.
String- A UUID (Universally Unique Identifier) is a unique string of characters. For example:2b22ee49-d788-4bf0-bacd-380b351ca1e0Int- An auto-incrementing integer.
When you use an integer, the first entry is usually 1. The next entry is 2, then 3, etc. This makes it easy to tell how many entries are in the database. It’s also easy to sort the entries by the order they were created. However, this can also create a security risk. It’s easy to guess the next entry in the sequence.
For example, if the URL for my job application is https://applywize.app/applications/1, I could assume the URL for the next application is: https://applywize.app/applications/2.
This is where a UUID comes in handy. A UUID is a unique, random string of characters. It’s almost impossible to guess an entry’s ID. The URL https://applywize.app/applications/2b22ee49-d788-4bf0-bacd-380b351ca1e0 isn’t quite as user friendly, but it’s security by obscurity.
Which is better? It depends. My general rule of thumb is if the user is going to see the ID (like our example, in the URL), use a UUID (string). If the ID is an internal identifier, use an integer.
Application Model
Section titled “Application Model”Let’s start with the Application model.
I need the following data:
| Field | Type | Notes |
|---|---|---|
id | String | A UUID |
salaryMin | String | Optional. The minimum salary for the job. |
salaryMax | String | Optional. The maximum salary for the job. |
dateApplied | DateTime | Optional. The date the application was submitted. |
jobTitle | String | Optional. The job title |
jobDescription | String | Optional. The job description. |
postingUrl | String | Optional. The URL to the job posting. |
archived | Boolean | False by default. Whether the application has been archived |
createdAt | DateTime | The date the application was created. |
updatedAt | DateTime | The date the application was last updated. |
Now, we need to translate all this information into a Prisma model. Prisma has it’s own syntax for defining models. You’ll notice that it looks similar to an object definition:
model Application { id String @id @default(uuid()) salaryMin String? salaryMax String? dateApplied DateTime? jobTitle String? jobDescription String? postingUrl String? archived Boolean @default(false) createdAt DateTime @default(now()) updatedAt DateTime? @updatedAt}A few things worth noting:
- The
?means that that field is optional. - Some fields are followed by a Prisma directive. For example,
@idmeans that the field is the primary key. - We can specify a default value with the
@default()directive.- The
@default(uuid())means that the field will be assigned a UUID - The
@default(false)means that the field will befalseby default - The
@default(now())means that the field will be the current date and time
- The
- The
@updatedAtdirective is a special directive that tells Prisma to update the field with the current date and time whenever the record is updated.
We can do the same for the remaining models (I didn’t make any changes to the provided User and Credential models, but included them here for reference).
...
model ApplicationStatus {  id           Int           @id @default(autoincrement())  status       String}
model Company {  id           String        @id @default(uuid())  name         String  createdAt    DateTime      @default(now())  updatedAt    DateTime?     @updatedAt}
model Contact {  id        String    @id @default(uuid())  firstName String  lastName  String  email     String?  role      String?  createdAt DateTime  @default(now())  updatedAt DateTime? @updatedAt}
model Credential {  id           String   @id @default(uuid()) // Internal DB ID  userId       String   @unique // Each user has one discoverable credential  user         User     @relation(fields: [userId], references: [id])  createdAt    DateTime @default(now())  credentialId String   @unique // WebAuthn credential identifier  publicKey    Bytes  counter      Int      @default(0)
  @@index([credentialId])  @@index([userId])}
model User {  id           String        @id @default(uuid()) // User ID (UUID-based)  username     String        @unique  createdAt    DateTime      @default(now())  updatedAt    DateTime?     @updatedAt
credentials Credential[] // Relationship: One user can have many credentials}This looks good, but we haven’t defined any of the relationships between the models (Other than the preexisting relationship between User and Credential models, defined in the starter template).
What are Database Relationships?
Section titled “What are Database Relationships?”A relationship in database terms describes how data in one table connects to data in another table. Think of it like connections between people in real life - you might have relationships with your coworkers, family members, or friends. In our job application tracker, we have similar connections between our data.
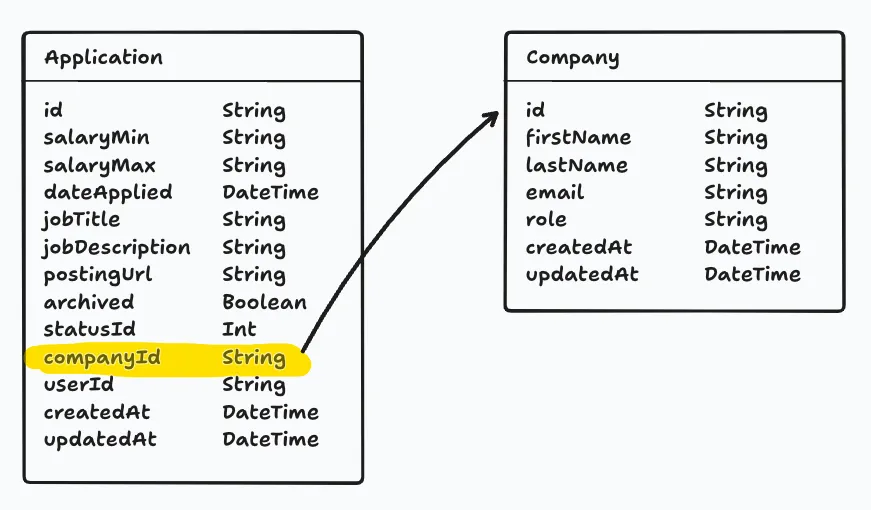
For example, every job application belongs to a specific company, and every company can have multiple job applications associated with it. This creates a relationship between our Application table and Company table. Without relationships, we’d have duplicate information — we’d have to store all the company information (name, address, website) separately in every single application record.
Relationships solve this problem by letting us store company information once in a Company table, and then simply reference which company each application belongs to. This keeps our data organized, prevents duplication, and makes it much easier to maintain and update information over time.
There are different types of relationships depending on how the data connects. For example, one company can have many job applications (like if you apply to RedwoodSDK multiple times), but each individual application belongs to only one company. Understanding these connection patterns helps us design a database that’s efficient, organized, and easy to work with.
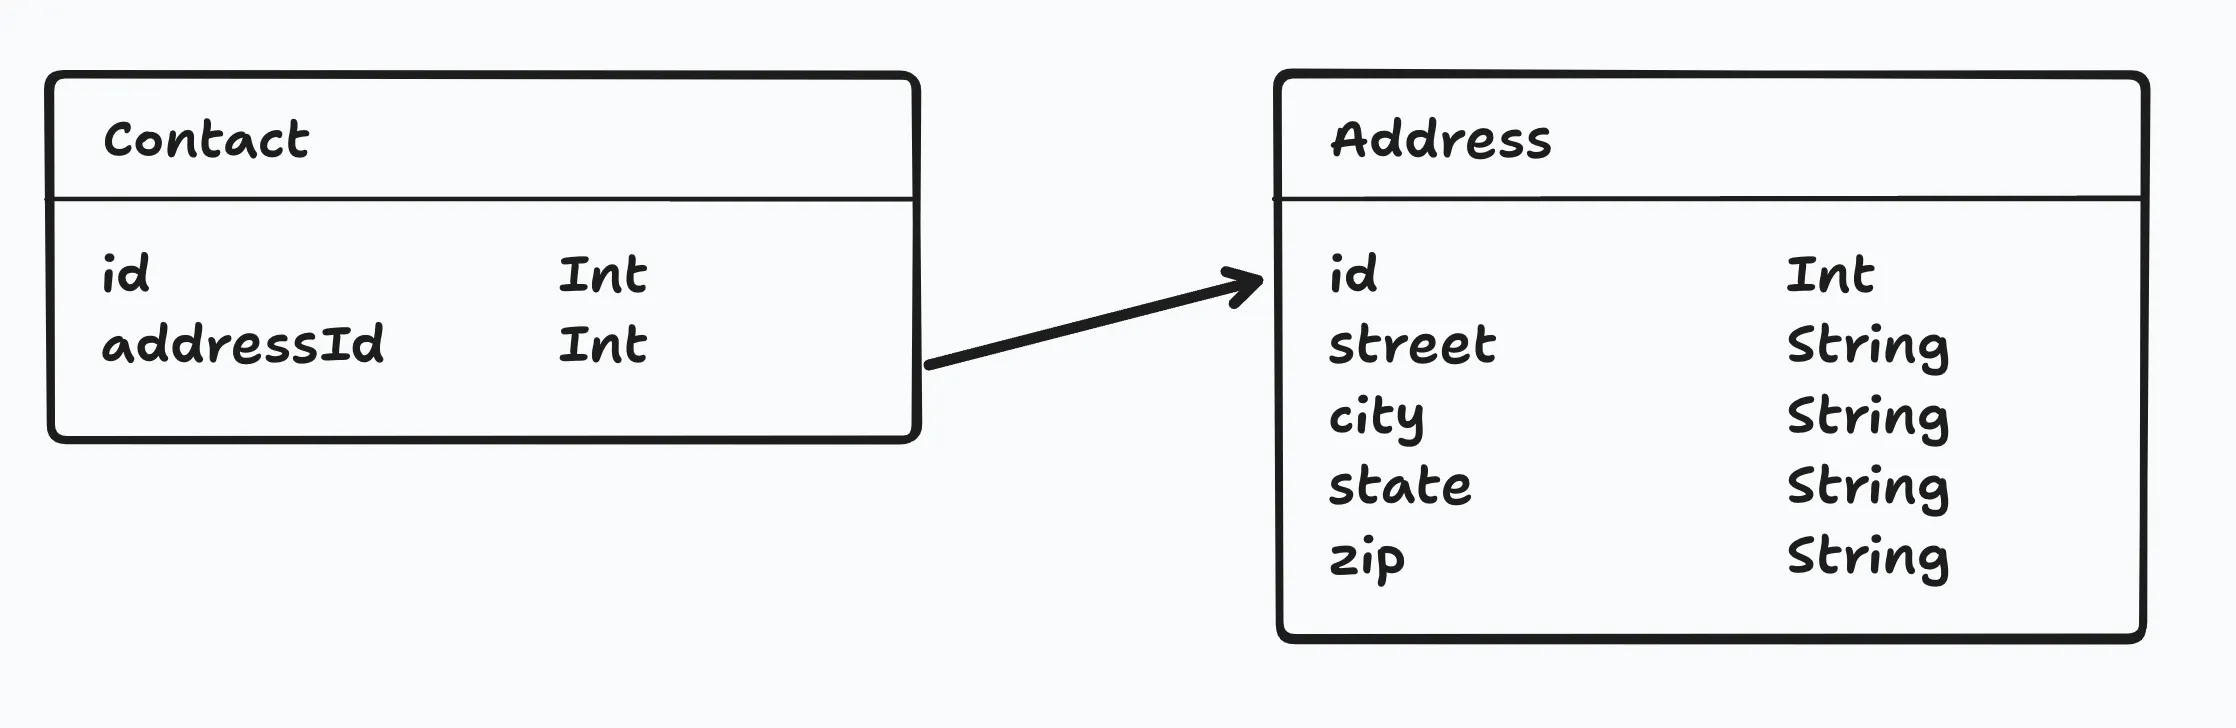
One-to-one
Section titled “One-to-one”A one-to-one relationship is a relationship where a record in one table is associated with exactly one record in another table.
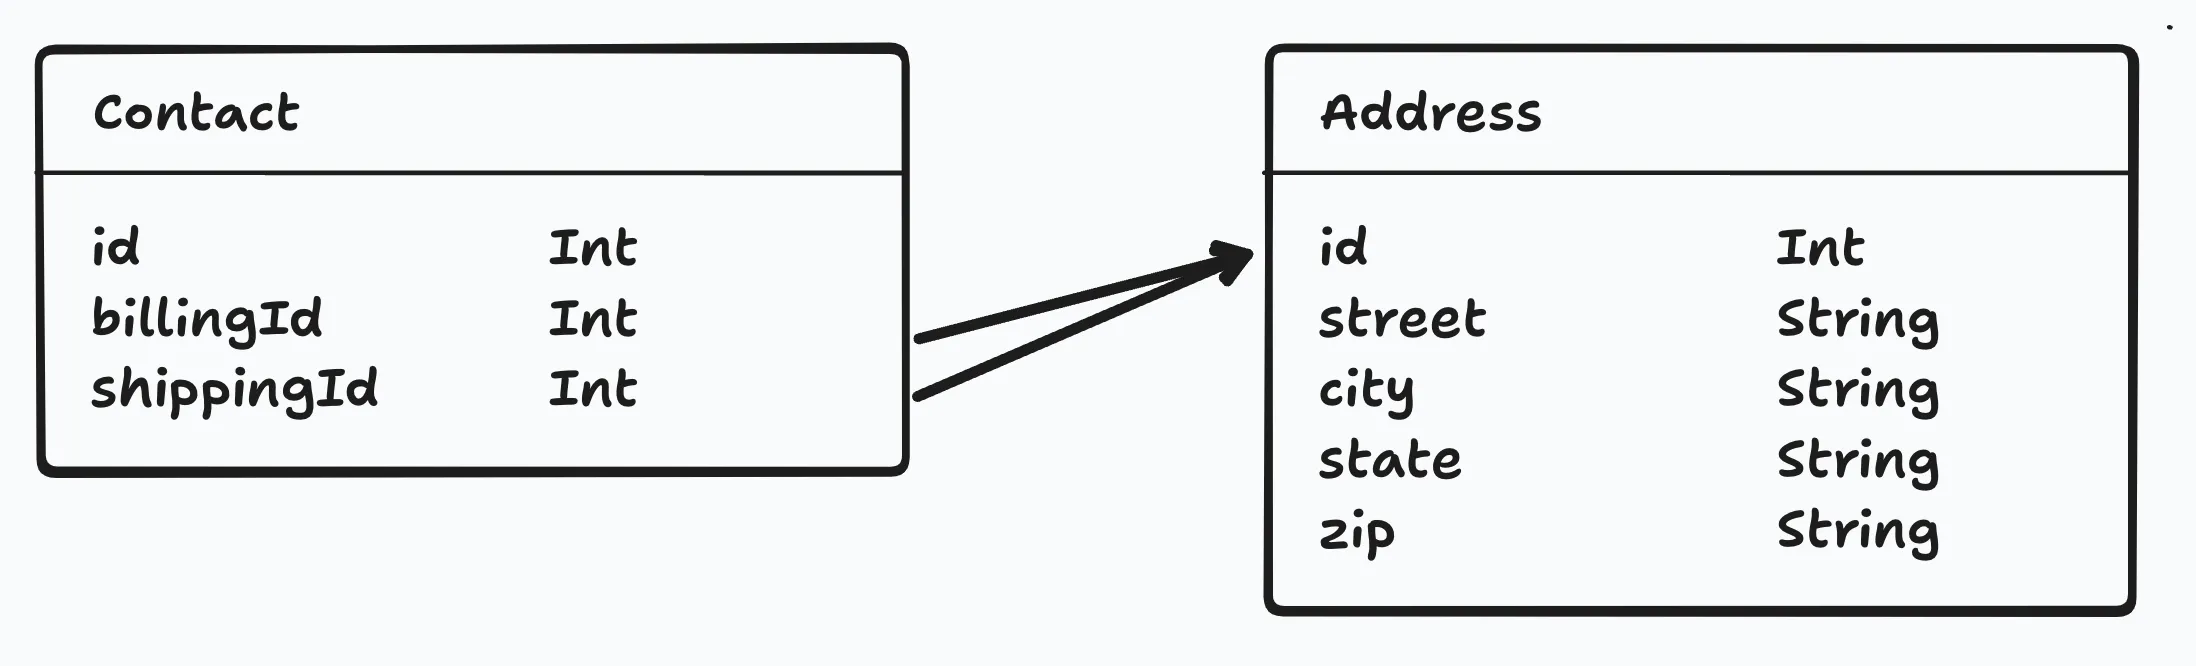
One-to-many
Section titled “One-to-many”A one-to-many relationship is a relationship where a record in one table is associated with one or more records in another table.
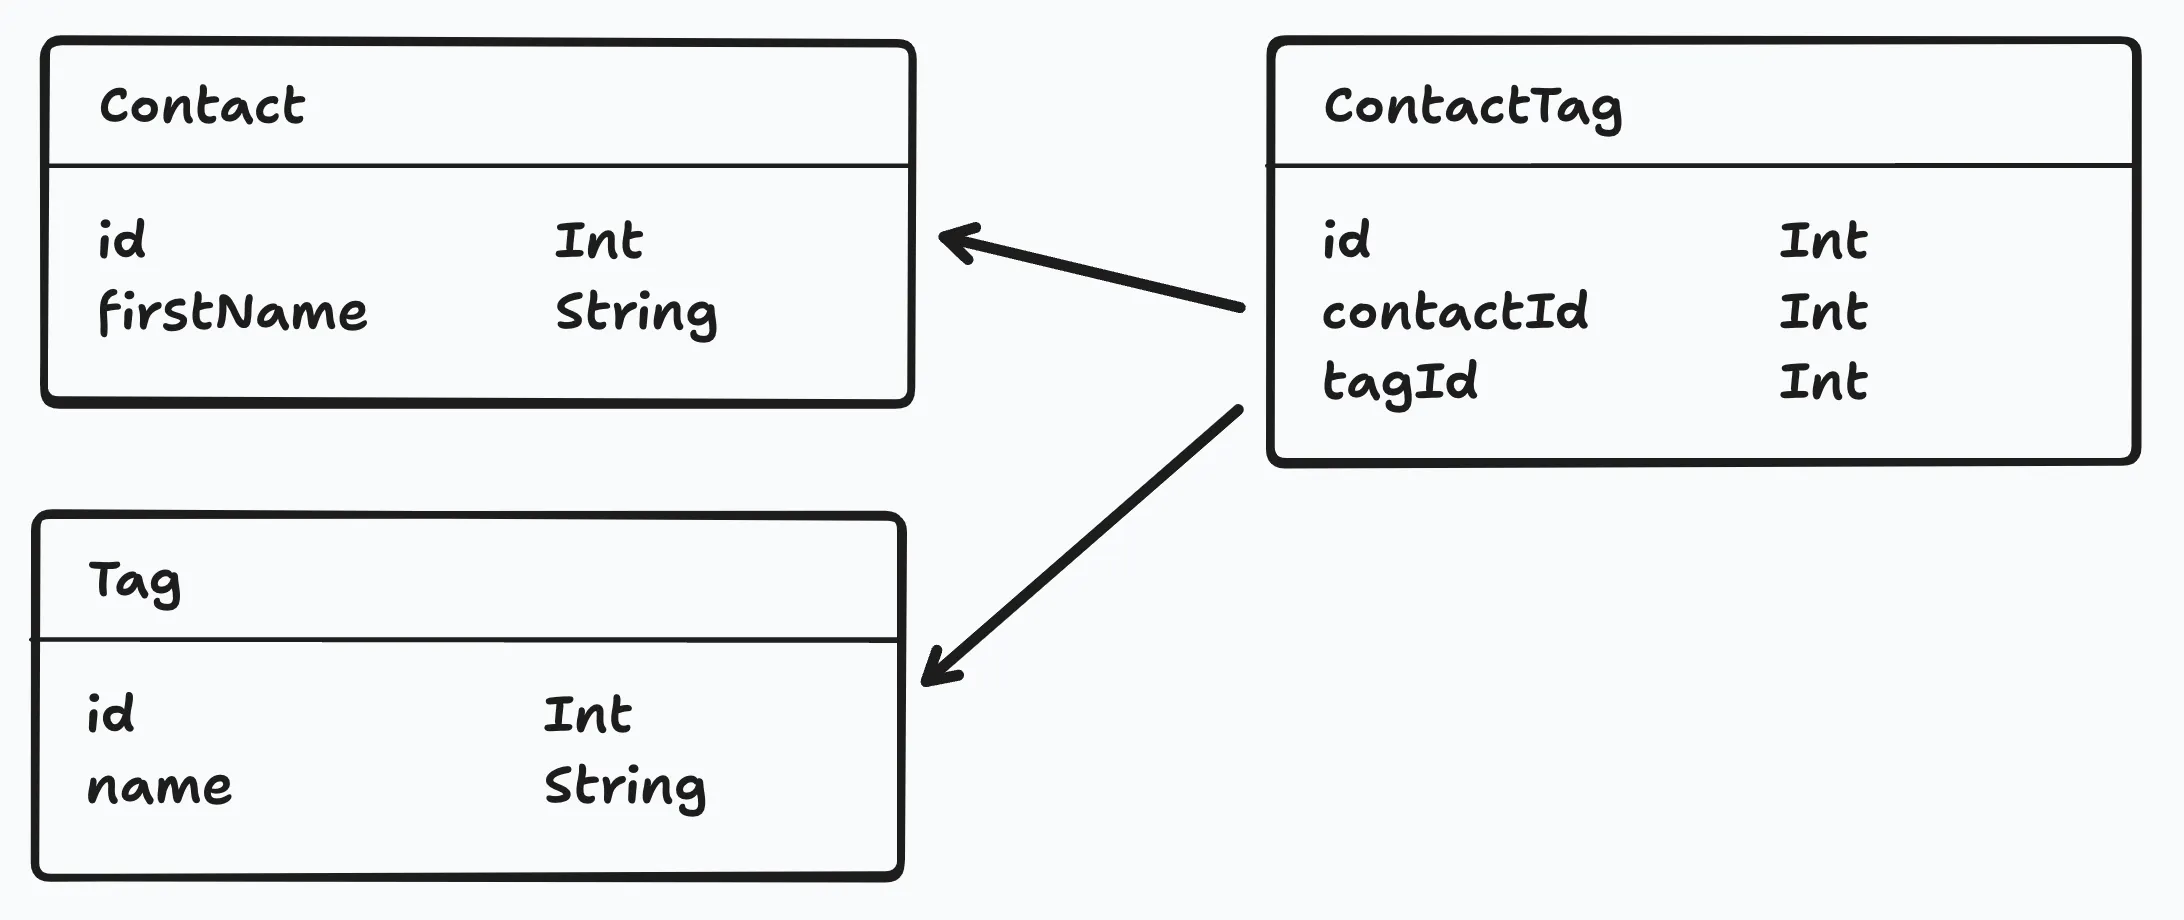
Many-to-many
Section titled “Many-to-many”A many-to-many relationship is a relationship where multiple records in one table are associated with multiple records in another table.
In order to establish this relationship, we need a junction table. This table will store the relationship between the two tables.
All the Tables for our Database
Section titled “All the Tables for our Database”Here’s a diagram of all the models and their relationships for this project.

Coincidentally, all the relationships in our project are one-to-one or one-to-many.
Relationships within Prisma
Section titled “Relationships within Prisma”When establishing a relationship within your schema, there are 3 parts.
- Foreign Key Column This stores the ID for the related record.
- Relation Field. This defines the relationship between the two models. It allows you to access the related records and uses a
@relationdirective to specify the connection details. - Implicit Relationship Field Allows you to access related records from the other side of the relationship
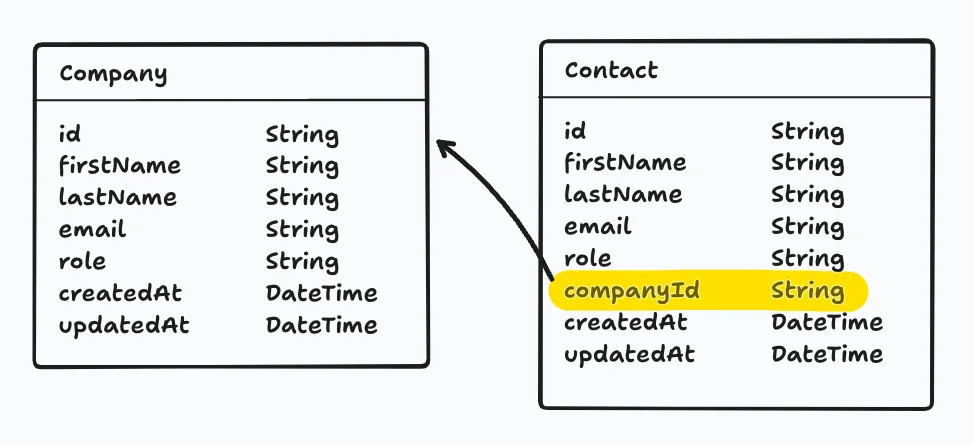
Let’s look at this in practice. On the Company and Contact models:
model Company {  id           String        @id @default(uuid())  name         String
  contacts     Contact[]  createdAt    DateTime      @default(now())  updatedAt    DateTime?     @updatedAt}
model Contact {  id        String    @id @default(uuid())  firstName String  lastName  String  email     String?  role      String?
  companyId String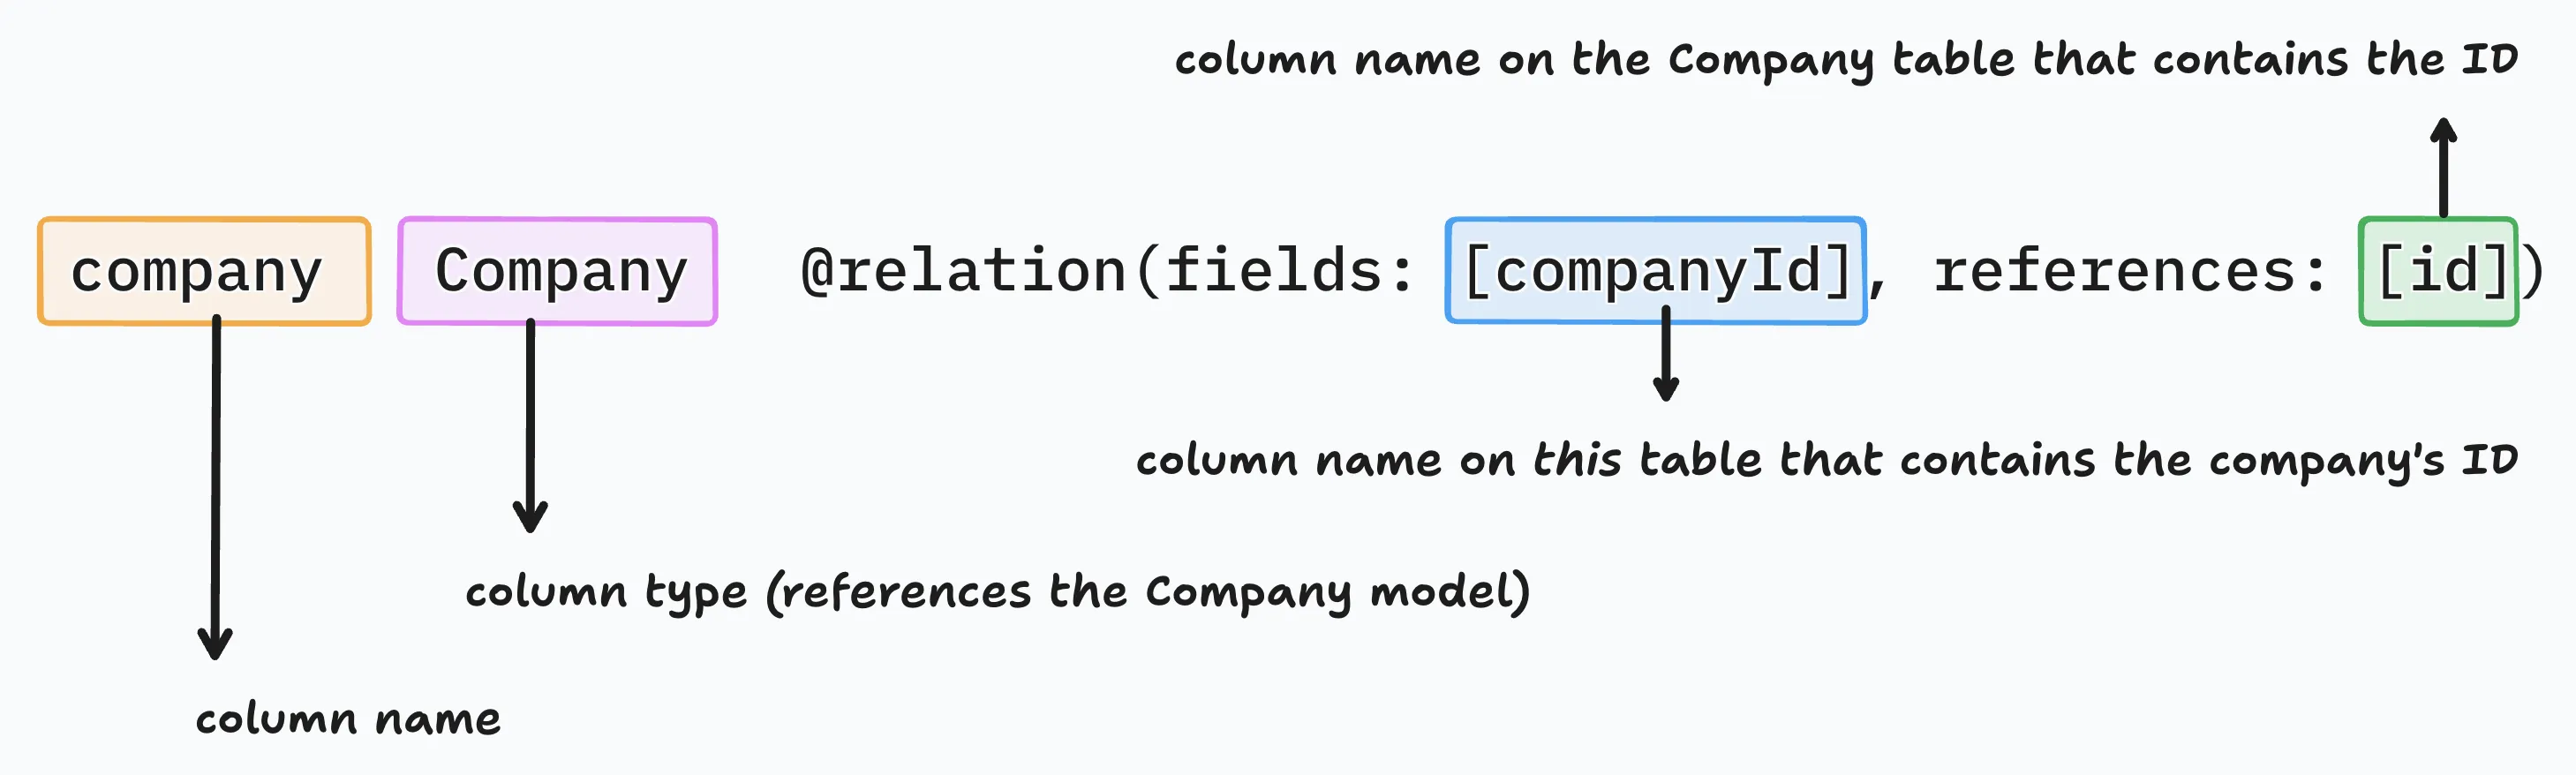
company Company @relation(fields: [companyId], references: [id]) createdAt DateTime @default(now()) updatedAt DateTime? @updatedAt}- On the
Contactmodel, we added acompanyIdfield. This stores the ID of the relatedCompanyrecord. Because theidfield on theCompanymodel is a string, ourcompanyIdfield is also a string. - On the
Contactmodel, we also added acompanyfield. This describes the Contact↔Company relationship for Prisma.- You can read this as: “A contact belongs to a company.”
- It is connected to the
Companymodel. You can also think of this as having a type ofCompany. - It uses the
companyIdfield on theContactmodel to connect the two models. - It references the
idfield on theCompanymodel.
- On the
Companymodel, we added acontactsfield. This describes the Company↔Contact relationship to Prisma.- You can read this as: “A company has many contacts.”
- The type of content will be an array
[]ofContactrecords.
In some cases, you might need to give the relationship a name. This is particularly useful when you have multiple relationships between the same models.
As an example, I’ve named the relationship CompanyContacts. Notice this is defined on both the relation field and the implicit relationship field.
model Company {  id           String        @id @default(uuid())  contacts     Contact[]     @relation("CompanyContacts")  ...}
model Contact {  id        String    @id @default(uuid())  companyId String  company   Company   @relation("CompanyContacts", fields: [companyId], references: [id])}
You can find more information about naming relationships in the Prisma documentation.
Now, we need to create the remaining relationships. Here’s my final schema.prisma file.
// This is your Prisma schema file,// learn more about it in the docs: https://pris.ly/d/prisma-schema
// Looking for ways to speed up your queries, or scale easily with your serverless or edge functions?// Try Prisma Accelerate: https://pris.ly/cli/accelerate-init
generator client { provider = "prisma-client"
runtime = "workerd" moduleFormat = "esm" generatedFileExtension = "ts" importFileExtension = "ts"
output = "../generated/prisma" previewFeatures = ["queryCompiler", "driverAdapters"]}
datasource db { provider = "sqlite" url = env("DATABASE_URL")}
model Application { id String @id @default(uuid()) userId String user User @relation(fields: [userId], references: [id]) status ApplicationStatus @relation(fields: [statusId], references: [id]) statusId Int @default(1) salaryMin String? salaryMax String? dateApplied DateTime? jobTitle String? jobDescription String? postingUrl String? createdAt DateTime @default(now()) updatedAt DateTime? @updatedAt archived Boolean @default(false) companyId String company Company @relation(fields: [companyId], references: [id])}
model ApplicationStatus { id Int @id @default(autoincrement()) status String applications Application[]}
model Company { id String @id @default(uuid()) name String applications Application[] contacts Contact[] createdAt DateTime @default(now()) updatedAt DateTime? @updatedAt}
model Contact { id String @id @default(uuid()) firstName String lastName String email String? role String? companyId String? company Company? @relation(fields: [companyId], references: [id]) createdAt DateTime @default(now()) updatedAt DateTime? @updatedAt}
model Credential { id String @id @default(uuid()) // Internal DB ID userId String @unique // Each user has one discoverable credential user User @relation(fields: [userId], references: [id]) createdAt DateTime @default(now()) credentialId String @unique // WebAuthn credential identifier publicKey Bytes counter Int @default(0)
@@index([credentialId]) @@index([userId])}
model User { id String @id @default(uuid()) username String @unique createdAt DateTime @default(now()) updatedAt DateTime? @updatedAt applications Application[] credentials Credential[]}Running Migrations
Section titled “Running Migrations”A migration is a change to the database schema. It’s a way to keep track of the changes we make to the database.
When we create the migration, Prisma will look at our schema.prisma file and determine what has changed since our last migration. Then, it will generate a SQL file that will update our database with the changes.
Let’s create the migration by running migrate:new and give our migration a name. Since this is our first migration, we’ll say: setup all database models.
npm run migrate:new "setup all database models"pnpm run migrate:new "setup all database models"yarn run migrate:new "setup all database models"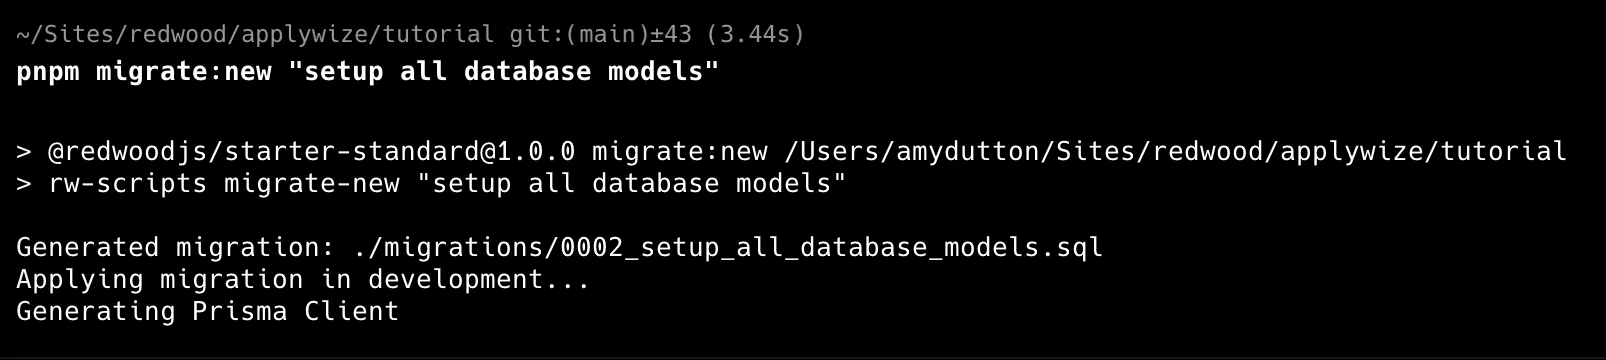
Our generated sql file will be in the migrations folder.
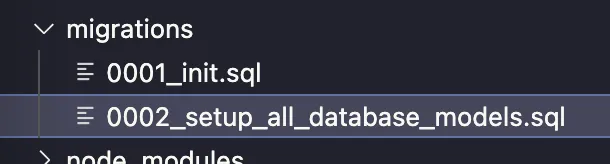
0001_init.sqlwas generated the first time we ranpnpm dev.0002_setup_all_database_models.sqlwas generated when we ranpnpm migrate:new "setup all database models".
Previewing the Migration
Section titled “Previewing the Migration”If you want to preview the database, there are a couple of different options.
Prisma Studio (Recommended)
Section titled “Prisma Studio (Recommended)”Prisma Studio ships with Prisma, so there’s nothing extra to install.
Let’s start by opening the schema.prisma file.
datasource db { provider = "sqlite" url = env("DATABASE_URL")}You’ll notice the url is referencing the DATABASE_URL environment variable.
We need this to set this up in the .env file so Prisma Studio can connect to the database.
First, let’s go to our d1 database. This is inside the .wrangler/state/v3/d1/miniflare-D1DatabaseObject directory.
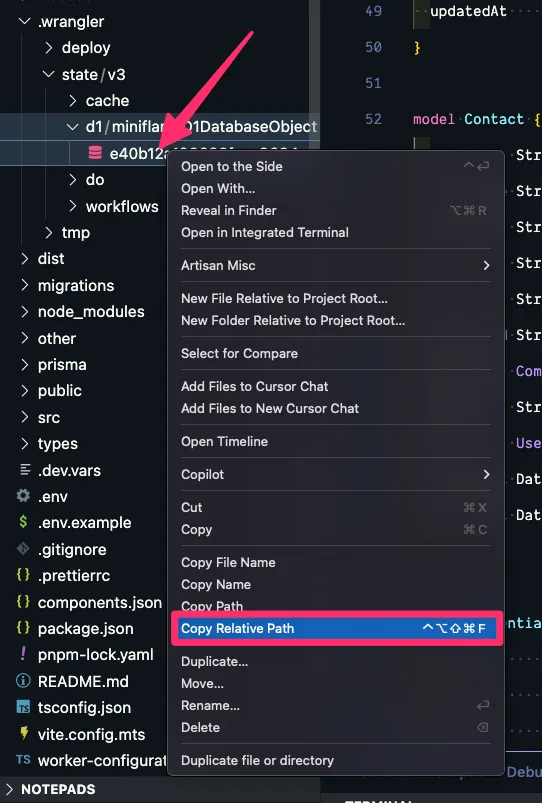
Right click on the sqlite file and click Copy Relative Path.
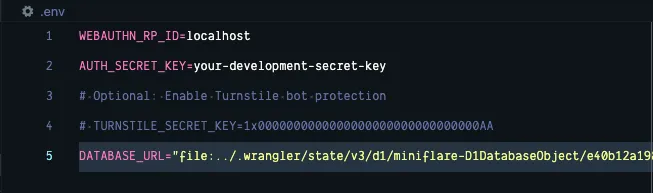
Inside your .env file, create a DATABASE_URL variable. We need to specify that this is a file:
DATABASE_URL="file:../"Then, paste in the database path:
Now, within the Terminal, run:
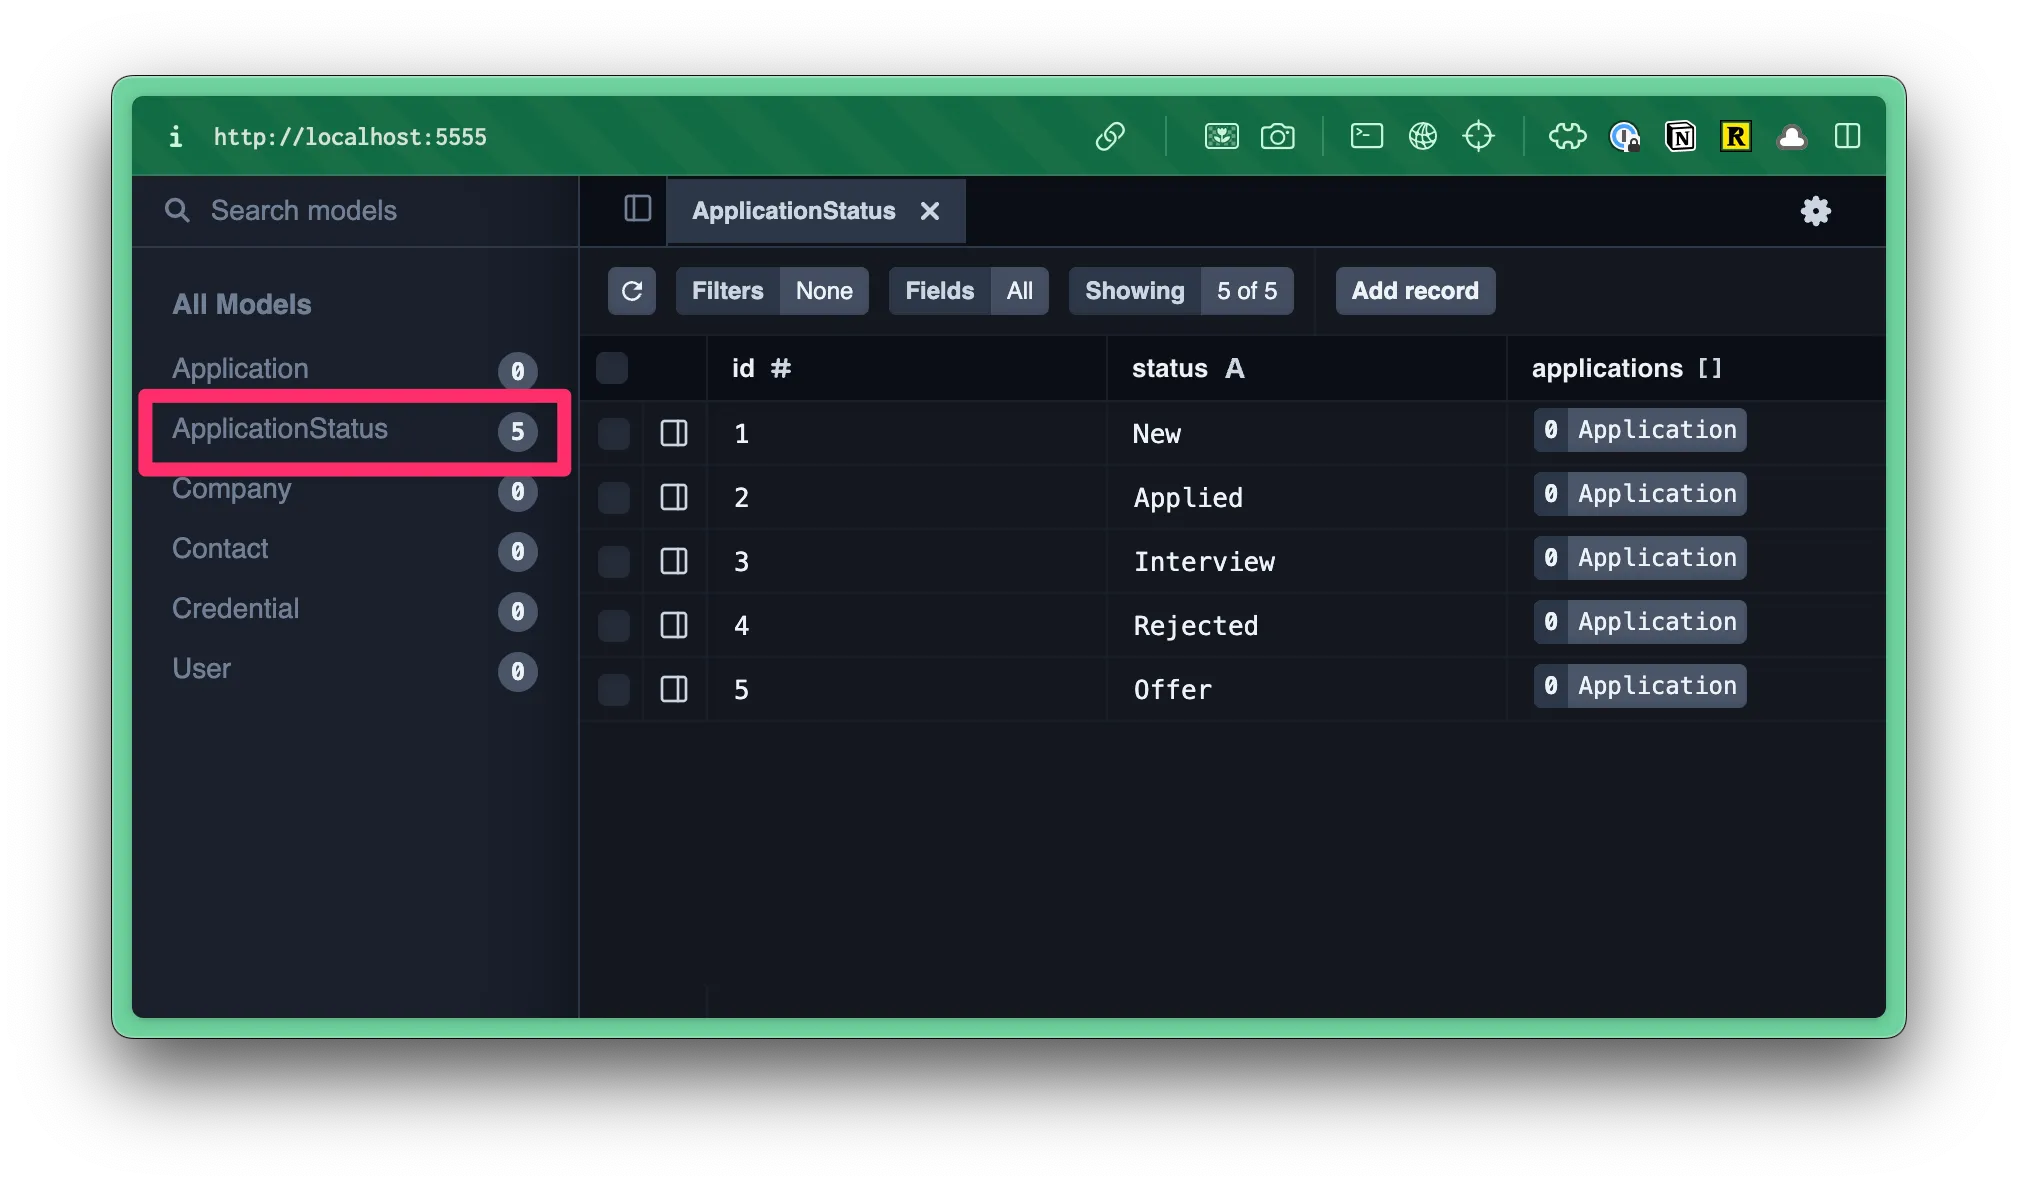
npx prisma studioThis will open a new tab in your default browser at http://localhost:5555.
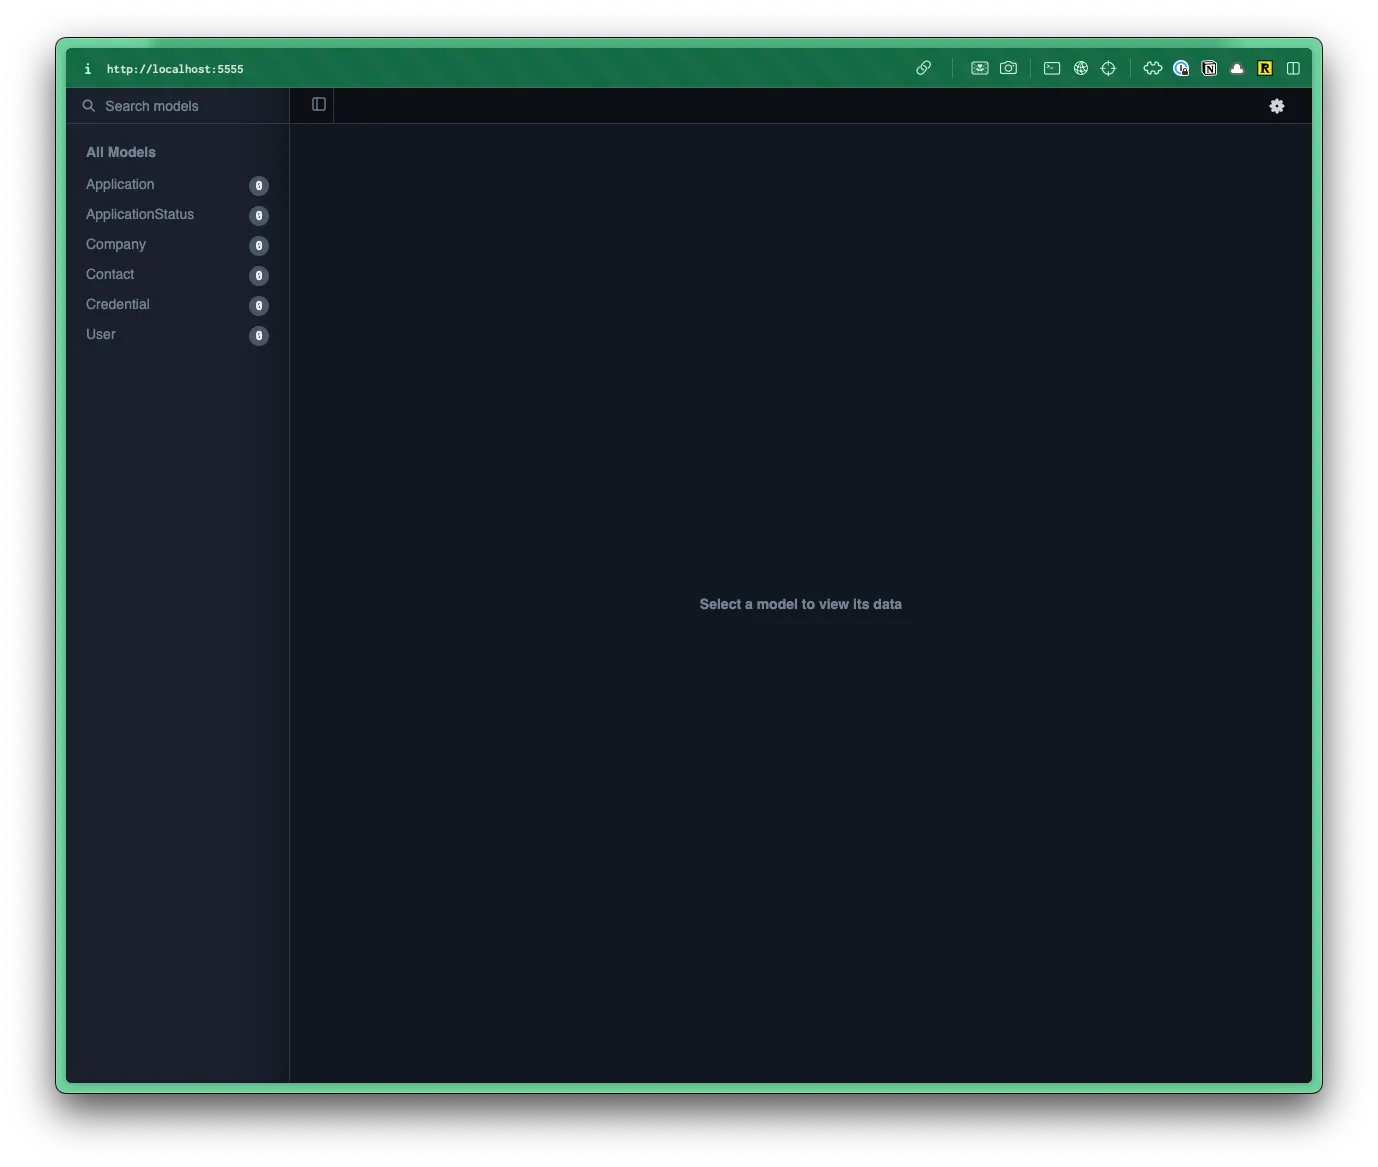
- Within Prisma Studio, you can see a list of all your tables/models on the left.
- If you click on one, it will load the table/model on the right.
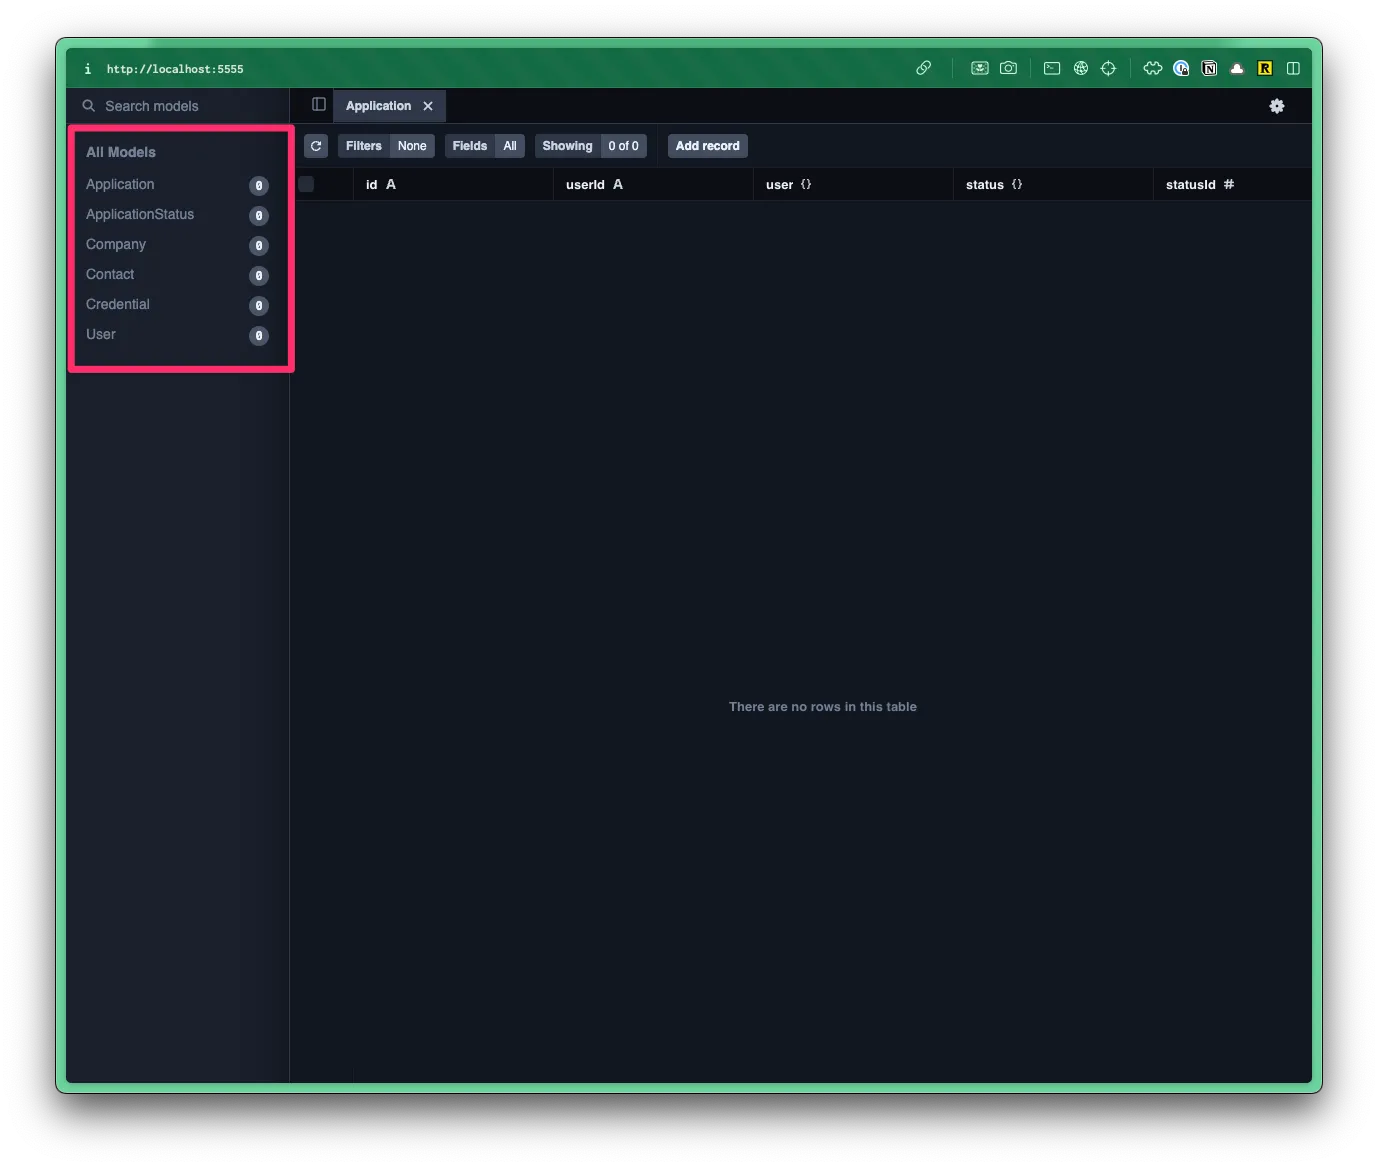
Right now, we don’t have any data in our table, but at least we can tell that our migration ran successfully.
SQLite Viewer
Section titled “SQLite Viewer”The VS Code extension, SQLite Viewer is perfect for previewing your SQLite database directly within VS Code.
Within the file explorer, navigate to your D1 database. You can find it in the .wrangler > state > v3 > d1 > miniflare-D1DatabaseObject folder.
Directory.wrangler
Directorystate
Directoryv3
Directoryd1
Directoryminiflare-D1DatabaseObject/
- 005cb3d3133217f352562272facf516778925ea1151d9c310bcb4e13614995c1.sqlite
The file name of your sqlite database will vary.
Click on the sqlite file and a preview should open within VSCode.
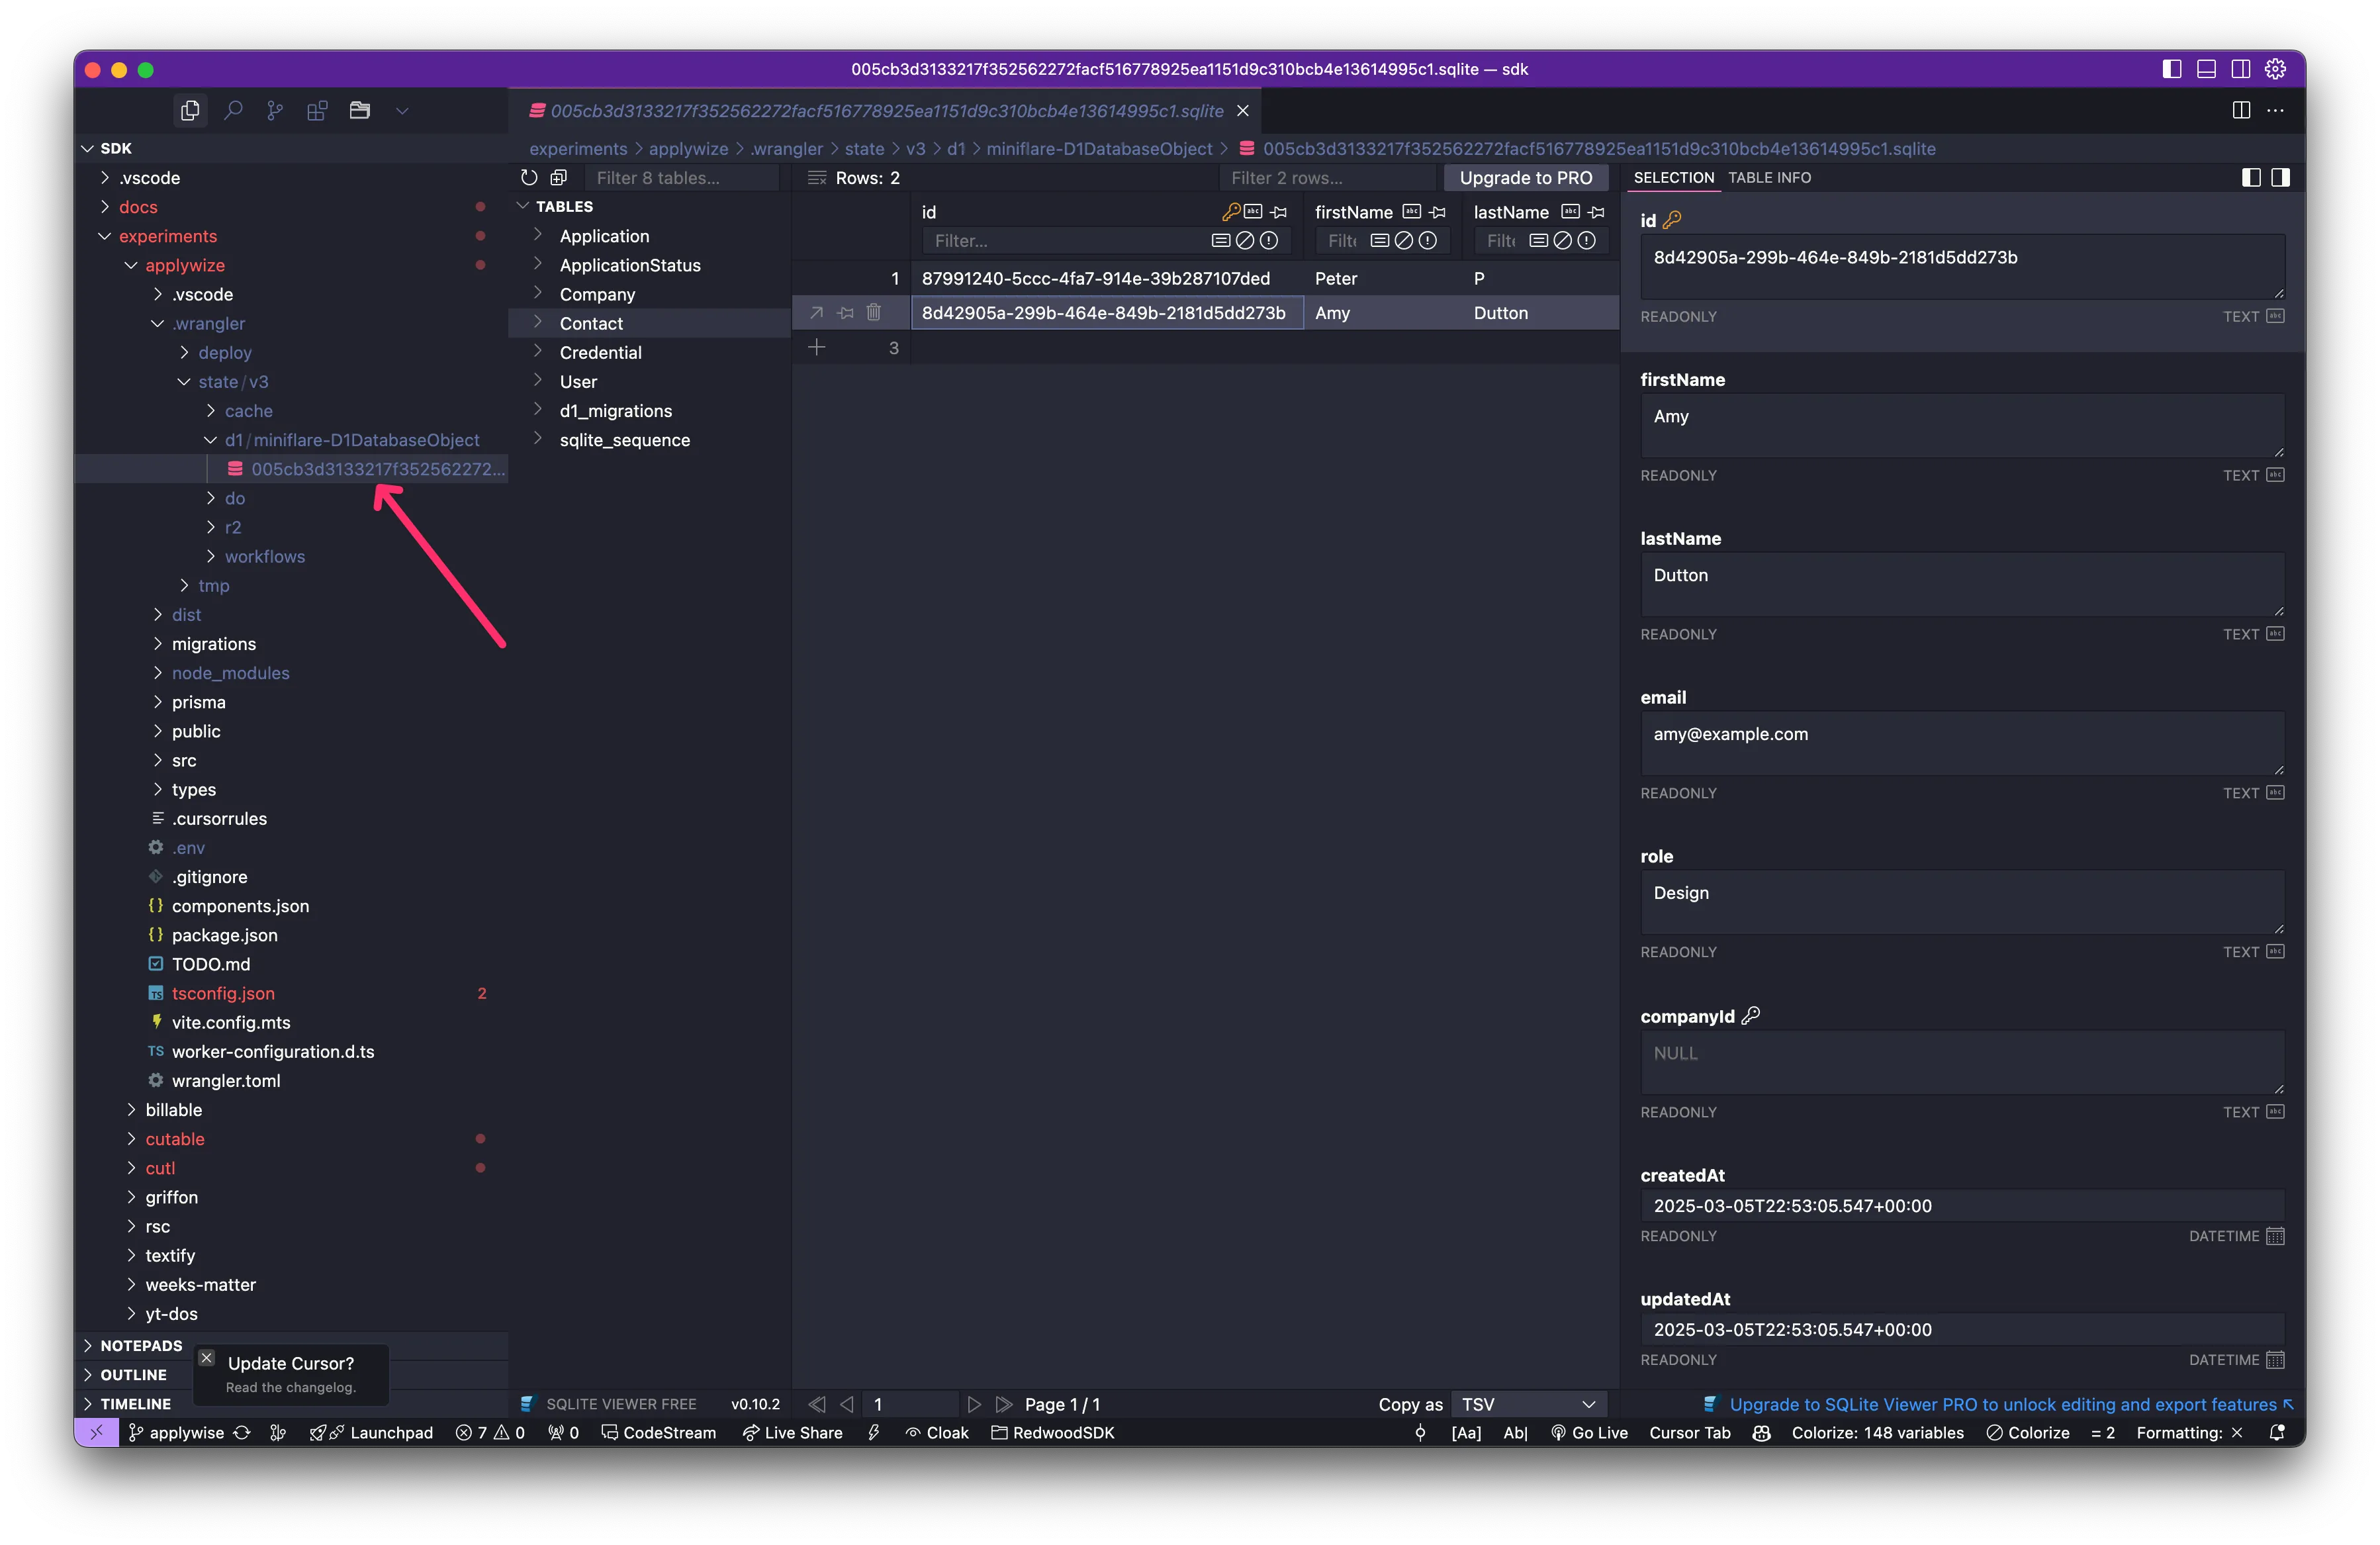
The viewer will only let you preview the database. If you want to create, update, or delete, you’ll need a pro (premium) account.
Seed the database
Section titled “Seed the database”We can manually add data to the database through Prisma Studio.
Instead of manually adding data to the database, we can create a seed file to programmatically add data for us. This is particularly helpful if you need to reset the database during development and don’t want to manually enter test data (again and again).
Within the src > scripts directory, you’ll find a seed.ts
Directorysrc/
Directoryscripts/
- seed.ts
This contains the basic structure for our seed file.
import { defineScript } from "rwsdk/worker";import { db, setupDb } from "@/db";
export default defineScript(async ({ env }) => { setupDb(env);
await db.$executeRawUnsafe(`\ DELETE FROM User; DELETE FROM sqlite_sequence; `);
await db.user.create({ data: { id: "1", username: "testuser", }, });
console.log("🌱 Finished seeding");});If you want to start fresh with your own seed file, you could delete lines 7-17, but we'll use this as a starting point.
You can copy and paste the following code to your project:
import { defineScript } from "rwsdk/worker";import { db, setupDb } from "../db";
export default defineScript(async ({ env }) => { setupDb(env);
await db.$executeRawUnsafe(`\ DELETE FROM Application; DELETE FROM ApplicationStatus; DELETE FROM Contact; DELETE FROM Company; DELETE FROM Credential; DELETE FROM User; DELETE FROM sqlite_sequence; `);
await db.applicationStatus.createMany({ data: [ { id: 1, status: "New" }, { id: 2, status: "Applied" }, { id: 3, status: "Interview" }, { id: 4, status: "Rejected" }, { id: 5, status: "Offer" }, ], });
console.log("🌱 Finished seeding");});Let’s make sure we understand what’s happening:
- On lines 1 and 2 are importing our dependencies. We need our Cloudflare worker and database connection.
- On line 4, we’re setting up our Cloudflare worker environment.
- On line 5, we’re setting up our database connection.
- On line 7-15, we’re using raw SQL to delete all the existing data from the database. This will allow us to start fresh when seeding the database.
- On line 17-25, we’re adding all the job application statuses to the database. We’re using a standard Prisma
createManyfunction. This takes adataarray of objects. Each object contains the data for a single record. - On line 27, we’re logging a message to the console saying the seeding is complete.
To seed the database, run the following command:
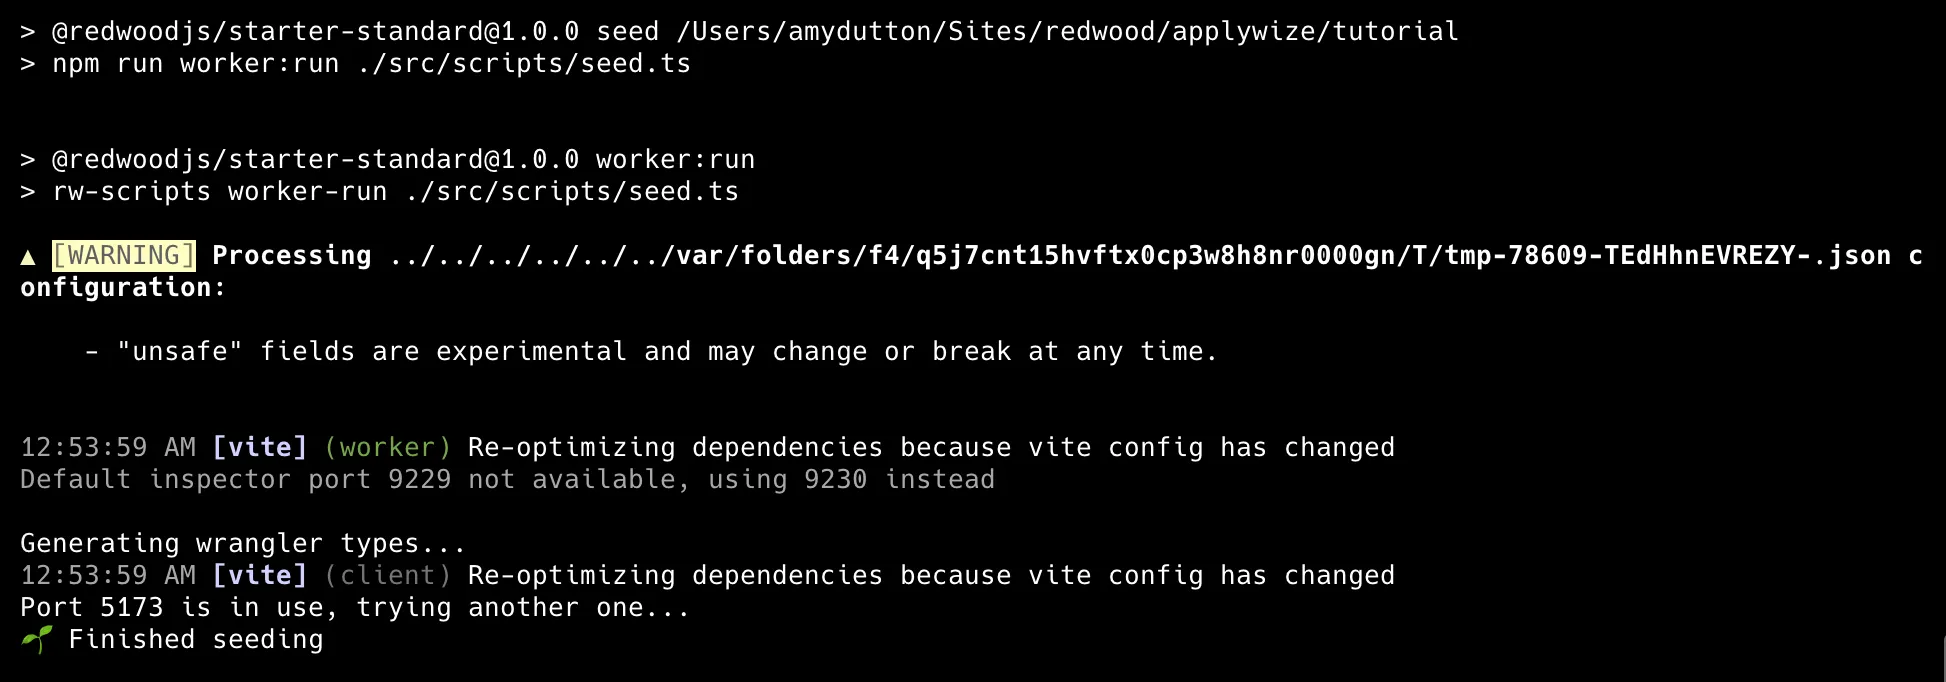
npm run seedpnpm run seedyarn run seedWithin the Terminal, you should see something like this:
Now, when you preview the database and look at the ApplicationStatus table, you should see: